Featured

Kamis, 27 Agustus 2009

UnrealIRCD di windows

Install UnrealIRCD Di Windows

1. Login Ke Terminal Server Anda atau Remote Desktop Anda
2. Download/wget http://www.vulnscan.org/unr/Unreal3.2.8.1.exe
3. Klik 2x Unreal3.2.8.1.exe

Unread3.2.7 atau versi yang terbaru. [update]

Klik Next Untuk Melanjutkan Menginstall UnrealIRCD


Tampilan awal dari UnrealIRCD

Pilih I accept the agreement kemudian Klik Next Untuk Melanjutkan Proses Installasi UnrealIRCD

Pilih Forder Tempat Untuk Meng-Install UnrealIRCD Kemudian Klik Next

Menentukan Nama Shortcut dari UnrealIRCD kemudian pilih Next

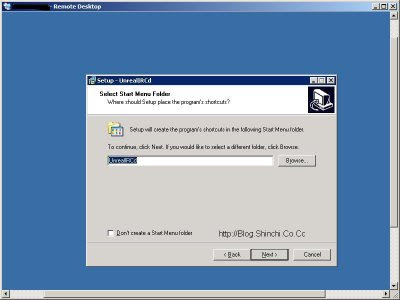
Klik Next Untuk Melanjutkan Penginstallan UnrealIRCD

Tunggu Proses Penginstalan

Klik Finish Yang Berarti Proses Penginstalan UnrealIRCD telah selesai

UnrealIRCD telah Selesai Di Install Sekadang Tinggal KOnfigurasi Unrealircd.conf

UnrealIRCD Untuk Windows

Proses Penginstalan UnrealIRCD udah Selesai dan belum secara keseluruhan, masih ada kofigurasi dari IRCD.

4. Configurasi UnrealIRCD
Untuk Configurasi UnrealIRCD dapat di gunakan 2 macam cara :
=> Links UnrealIRCD serta oper di gabungkan dalam satu file yaitu unrealircd.conf
=> Links UnrealIRCD Serta Oper di pisah dari unrealircd.conf sehingga file config akan menjadi 3 file yaitu unrealircd.conf sebagai config utama ircd connect.conf sebagai Links/HUB dan oper.conf sebagai file Oper untuk IRCop

Hanya unrealircd.conf saja :
Contoh file unrealircd.conf

Dengan 3 File :
Contoh file unrealircd.conf
Contoh file connect.conf
Contoh file oper.conf

File Tersebut Masih Dalam format *.txt dan harus di simpah dalam file *.conf pada Folder Utama Unreal

Source: Install UnrealIRCD Di Windows

Video Tutorial Install Unrealircd Di Windows
Video List http://Video.AnakDompu.Co.Cc

Selasa, 27 Januari 2009

The clearance sale Shop

Many sites online that provide a variety of goods that will be selling, but I do not like the cost of sending Shop.com free, and has a special discount. Shop.com site that sells a variety of needs, Shop.com offers products in every category, including clothing, electronics, furniture, house wares, children, gifts and more.

Sites with a variety of goods that are sold in it, with a discount, with discounts and free shipping of course. In addition to items mentioned in the above, there is music and videos in the selling.

Goods are sold at Shop.com goods is a new, affordable and a choice of colors that are suitable for use both our clothes and shoes.

No need to shop out of the house, with just a computer or laptop with internet connection, we can order the goods from the house with the quality of goods and prices

Selasa, 12 Agustus 2008

Tips & Tricks for securing BIND on linux

It's about time I wrote this article. In this topic we'll going to think worst case scenario. What if somebody found a very bad bug in your version of BIND? What if this bug allowed a hacker to execute commands on your system? Do we really have to place the security of our system and domains in the hands of the BIND programmers? NO! Place your security in the hands of linus torvalds (the mastermind behind linux) by using linux chroot, user/group, and file permissions to your advantage.

The magic that is setuid (Set User ID)

Let's pretend the worst case scenario happened. A hacker has exploited BIND and is running commands on your server through port 53 - the port BIND uses for DNS service. What is he able to do with this power? Well, lucky for you, you're probably already involved in linux security 101: don't EVER run services as root! Yes, sure, you have to run bind as root in order for BIND to use the restricted port 53. But if you're smart, you ran bind with the "-u" option to tell it to setuid() to a non-privilaged user. Typically, the user "named" is created for this purpose. The "named" user is granted permission to read and write to only files and directories bind has business with and any commands that a normal user is allowed to run. So don't worry, a hacker won't be able to tell BIND to run "rm -rf /" on your entire file system. BIND couldn't do it even if it wanted to after it setuid's to "named" and starts the dns service.

Linux file permissions

But BIND can't be denied all access rights. It needs to be able to read its configuration file named.conf. It needs to be able to read all the zone files. It also needs to be able to write its process id to a file (see BIND configuration docs for "pid-file"), and to write slave transfers to zone files, and if you use dynamic update, it needs to write to zone files and create journal files as well. You need to make sure it has these access rights. After all, you're not letting it run as root right? right???

Remember that anything BIND can do, your hacker can do as well. If BIND can write to your zone files, so can a hacker. A hacker might think it's funny to point your domain at a porn site. We need to limit this kind of destructive behavior. So let's start at the beginning of the typical BIND zone file directory tree:

/var/named/

BIND is the only user who has any right to be in this directory, so give it full access rights for the named user and group (assuming you've got a named group). The first command below says that only the user "named", and the any users in the group "named" has access to this directory. The second command says that the "user" has execute, read, and write permissions to the directory (the first 7). So does the group (the second 7). But everybody else isn't allowed to look or touch (the 0).

chown named:named /var/named
chmod 770 /var/named

Now for the interesting and fun part: customizing your system. By no means is this the only solution, but it's a solution that I figure sounds fun at the time. Create 2 more directories with appropriate permissions. The first directory will be for secured zones that BIND is only allowed to read from. The second directory is for unsecured zones that BIND is also allowed to write to. Remember that for chmod, the first digit is user permissions, the second digit is for group permissions, and the third is for everybody else. The number 7 is full permissions (4=read + 2=write + 1=execute). The number 5 is write access denied (4=read + 1=execute). Remember that directories must have execute permission to show their contents.

mkdir /var/named/secured
mkdir /var/named/unsecured
chown named:named /var/named/*
chmod 550 /var/named/secured
chmod 770 /var/named/unsecured

Ok sweet, now what do we do with this bit of architecture we've built? Place all your master zones in the secured directory. That way BIND isn't allowed to change them, but still being able to load them. Place all your slave and dynamic zones in the unsecured directory where BIND simply has to have write access. Then tell BIND where these zones are in your named.conf. At any time you can mass set the permissions for all your zone files with the following commands. The first command grants read access ONLY to all files in the secured directory. The second command grants read and write access for all files in the unsecured directory.

chmod 440 /var/named/secured/*
chmod 660 /var/named/unsecured/*

eh, you can probably take this concept and change the permissions for your named.conf and pidfile. But these are unimportant matters, so I'll leave that fun up to you. We're finished with the important part, and hopefully you now have a good handle on linux file permissions.

If you're still afraid BIND might hurt you, throw it in jail!

Even if BIND is doing the best it can by running as a non-privilaged user, you're not completely safe. What if a hacker working through BIND can exploit your system? This is part of the art of hacking. It's the use of imagination and creativity and pulling in all kinds of experience and knowledge toward a single goal - gaining root on your system. Through a series of commands and tricks and exploits the hacker might be able to reach this ultimate goal. Suddenly, nothing is safe anymore.

But this giant in security that is linux has yet another line of defense: chroot. By running it in chroot, the program is restricted to a tight little box where their burly brutish jail keeper is the linux kernel itself. In this situation the kernel is not impressed by root permissions, and will quarantine BIND from the system no matter what it has to say about it. But enough glamour, how do we get it working? First of all, you execute BIND like so:

named -u named -t /jail/named

The path can be anything you want. I just chose "/jail/named" cause you might want to jail other services besides named, and the named directory is its own little special box. But yeah, it's the -t option that tells BIND to tell the kernel to throw it in jail. Once in jail, BIND has a totally new directory heirarchy:

/jail/named/var/named/secured/
/jail/named/var/named/unsecured/

See what's happening here? Anytime BIND is looking for a file called "/var/named/secured/bob.zone" it is really accessing the file "/jail/named/var/named/secured/bob.zone". That's where the name comes from. Chroot = Change Root. You are creating a virtual root directory from BIND's perspective. There's some work involved in making sure the jail is habitable by BIND, cause stuff like "/dev/null" and "/dev/random" will no longer be accessible unless you setup an equivilent in "/jail/named/dev/null" and "/jail/named/dev/random". Writing a tutorial for chroot'ing BIND is beyond the scope of this document (to be honest, I've never bothered with it). But here's what looks like a good tutorial on how to prepare the jail and place BIND in it:

www.faqs.org: Chroot-BIND-HOWTO


source : http://forums.devshed.com/dns-36/bet-you-want-to-setup-a-dns-server-huh-141940.html
Copyright © 2015 Flash Info On Blog